# 第六章 后端精选主题管理
本小节我们将开始学习原型APP首页的另一个运营模块精选主题的管理接口开发,有了前面轮播图管理小节的基础,接下来的接口开发可以说套路都是大同小异,一些操作指引就不再重复啰嗦了。有点不一样的是精选主题的数据表设计运用到了另一种数据库表的关联关系——多对多,即一个主题包含多个商品,同时一个商品又可以同时属于多个主题,这也是一种很常见的业务情况,本小节将会带领大家如何利用lin-cms-tp5来管理这种业务数据。
# 查询所有精选主题
老套路,起手来个控制器,在控制器层下新建Theme控制器类,同时增加一个getSimpleList()方法:
<?php


namespace app\api\controller\v1;


class Theme
{
    public function getSimpleList()
    {

    }
}
2
3
4
5
6
7
8
9
10
11
12
13
要查询当然少不了模型,通过查看数据库,我们知道精选主题的记录存放于theme表中,那就在模型层目录下新建一个Theme模型类:
<?php


namespace app\api\model;


use think\Model;

class Theme extends Model
{

}
2
3
4
5
6
7
8
9
10
11
12
13
回到我们的控制器中,我们来调用一下模型进行查询:
<?php


namespace app\api\controller\v1;

use app\api\model\Theme as ThemeModel;

class Theme
{
    public function getSimpleList()
    {
        // 调用模型的select()方法,默认是查询所有记录
        $result = ThemeModel::select();
        return $result;
    }
}
2
3
4
5
6
7
8
9
10
11
12
13
14
15
16
控制器和模型都定义完毕,我们来给这个接口定义一条路由,打开route.php文件,同样在v1路由分组下面我们新增一个theme的路由分组,并在分组下面定义一条路由规则:
Route::group('', function () {
    Route::group('cms', function () {
        // CMS管理相关的路由规则
        // 内容省略。。。。
    });
    Route::group('v1', function () {
        // 业务接口相关的路由规则
        ............................
        Route::group('theme',function(){
            Route::get('','api/v1.Theme/getSimpleList');
        });
    });
})->middleware(['Auth','ReflexValidate'])->allowCrossDomain();
2
3
4
5
6
7
8
9
10
11
12
13
接下来就是见证奇迹时刻,打开我们的Postman,按照上一小节中的操作方式,新增一个Request并分配一个目录分类整理好:
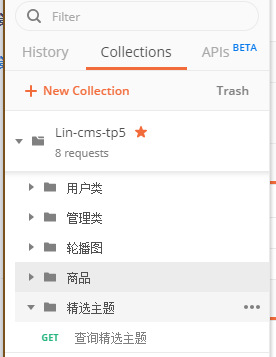
接着再地址栏中输入我们接口地址,点击发送请求:
[
    {
        "id": 1,
        "name": "专题栏位一",
        "description": "美味水果世界",
        "topic_img_id": 16,
        "delete_time": null,
        "head_img_id": 49,
        "update_time": null
    },
    {
        "id": 2,
        "name": "专题栏位二",
        "description": "新品推荐",
        "topic_img_id": 17,
        "delete_time": null,
        "head_img_id": 50,
        "update_time": null
    },
    {
        "id": 3,
        "name": "专题栏位三",
        "description": "做个干物女",
        "topic_img_id": 18,
        "delete_time": null,
        "head_img_id": 18,
        "update_time": null
    }
]
2
3
4
5
6
7
8
9
10
11
12
13
14
15
16
17
18
19
20
21
22
23
24
25
26
27
28
29
没有报错,但是这里一样出现了上一小节内容的问题,就是图片相关的字段没有显示url路径而是image表中的记录id,解决办法很简答就是前面使用过的关联查询和获取器,但这里我们要思考另外一个问题。在这个接口,我们需要解决topic_img_id和head_img_id字段的问题么?答案很简单,假如我们的CMS前端,在显示主题列表的时候,产品经理说为了用户体验,除了显示主题的名称外还要显示主题的配图,如果你爽快的答应了,那么你就运用上一小节的知识秀一把操作,如果你回答“:这个需求做不了。”那么就进入下一小节的内容学习。这里为了巩固复习下前面的学习内容,同时满足产品经理的用户体验需求,我们还是来实现一下。打开我们的Theme模型,定义两个关联关系:
<?php


namespace app\api\model;


use think\Model;

class Theme extends Model
{
    protected $hidden = ['topic_img_id', 'head_img_id','delete_time','update_time'];

    public function topicImg()
    {
        // 等同于$this->belongsTo('Image', 'topic_img_id','id')
        return $this->belongsTo('Image', 'topic_img_id');
    }

    public function headImg()
    {
        return $this->belongsTo('Image', 'head_img_id');
    }
}
2
3
4
5
6
7
8
9
10
11
12
13
14
15
16
17
18
19
20
21
22
23
这里我们同样使用belongsTo()把当前Theme模型中的两个字段声明与Image模型的id字段关联,由于第三个参数默认就是id,这里直接省略。同时我们通过给$hidden变量赋值来隐藏一些我们不需要的字段。定义完关联关系之后,回到我们的Theme控制器下的getSimpleList()方法稍作修改:
<?php


namespace app\api\controller\v1;

use app\api\model\Theme as ThemeModel;

class Theme
{
    public function getSimpleList()
    {
        $result = ThemeModel::with('topicImg,headImg')->select();
        return $result;
    }
}
2
3
4
5
6
7
8
9
10
11
12
13
14
15
同样通过给with()传递我们刚刚定义了的两个方法名,接着回到Postman中,点击发送请求:
[
    {
        "id": 1,
        "name": "专题栏位一",
        "description": "美味水果世界",
        "topic_img": {
            "id": 16,
            "url": "http://localhost:8000/images/1@theme.png"
        },
        "head_img": {
            "id": 49,
            "url": "http://localhost:8000/images/1@theme-head.png"
        }
    },
    {
        "id": 2,
        "name": "专题栏位二",
        "description": "新品推荐",
        "topic_img": {
            "id": 17,
            "url": "http://localhost:8000/images/2@theme.png"
        },
        "head_img": {
            "id": 50,
            "url": "http://localhost:8000/images/2@theme-head.png"
        }
    },
    {
        "id": 3,
        "name": "专题栏位三",
        "description": "做个干物女",
        "topic_img": {
            "id": 18,
            "url": "http://localhost:8000/images/3@theme.png"
        },
        "head_img": {
            "id": 18,
            "url": "http://localhost:8000/images/3@theme.png"
        }
    }
]
2
3
4
5
6
7
8
9
10
11
12
13
14
15
16
17
18
19
20
21
22
23
24
25
26
27
28
29
30
31
32
33
34
35
36
37
38
39
40
41
这接口如你所愿!在答复产品经理之前,我还需要再稍微完善一下控制层的代码:
<?php


namespace app\api\controller\v1;

use app\api\model\Theme as ThemeModel;
use app\lib\exception\theme\ThemeException;

class Theme
{

    public function getSimpleList()
    {
        $result = ThemeModel::with('topicImg,headImg')->select();
        if ($result->isEmpty()){
            throw new ThemeException([
                'msg'=>'没有查询到主题内容'
            ]);
        }
        return $result;
    }
}
2
3
4
5
6
7
8
9
10
11
12
13
14
15
16
17
18
19
20
21
22
为了规范接口返回数据,当查询结果为空的时候,我们抛出一个404的异常,并给予提示信息。这里同样需要创建一个自定义异常类,在项目根目录下的application/api/lib/exception目录下新建一个theme目录并新建一个ThemeException类:
<?php

namespace app\lib\exception\theme;


use LinCmsTp5\exception\BaseException;

class ThemeException extends BaseException
{
    public $code = 404;
    public $msg = '主题不存在';
    public $error_code = 70002;
}
2
3
4
5
6
7
8
9
10
11
12
13
14
到这里我们本小节的查询所有精选主题接口就算开发完毕了,这里读者可能会有个疑问,主题下面包含的商品为什么不一起查询出来?这是因为无论是面向用户的APP还是面向后台管理的CMS,一般情况下都是先查询列表,通过点击列表中的某一项再去获取具体项目中包含的内容,这里要一起查询出来不是不可以,而是没多大必要,第一是不需要马上在当前页面显示所有很具体的内容(太考验ui和交互体验),第二是这个列表里的每一项可能包含了很多具体的内容,这会导致当你请求这个接口的时候返回的数据量很大,对前端和服务端的带宽及性能都会有影响。所以我们在处理精选主题内容管理的时候,一个接口负责查主题列表,另外会有一个专门负责查询指定主题id的接口,这个接口才会返回主题包含的商品,这也正是我们下一小节将要学习的内容。
# 查询精选主题详情
通过前面的学习,我们成功了拿到了所有精选主题的列表,但是主题里面有什么商品我们还不知道,本小节作者将带着大家来实现查询指定主题详情的接口,事不宜迟,让我们开始进入套路时间,首先是控制器,在控制器层的Theme控制器类下新增一个getThemeById()控制器方法:
<?php


namespace app\api\controller\v1;

use app\api\model\Theme as ThemeModel;
use app\lib\exception\theme\ThemeException;

class Theme
{

    public function getSimpleList(){...}

    /**
     * 查询指定主题详情
     * @param('id','精选主题id','require|number')
     */
    public function getThemeById($id)
    {

    }
}
2
3
4
5
6
7
8
9
10
11
12
13
14
15
16
17
18
19
20
21
22
通过前面轮播图管理章节的学习,我们已经养成了给接口参数做校验的习惯,所以这里我们顺手就给它个参数校验的注解。定义完控制器方法之后,我们要查询数据,自然就是调用模型,那么问题来了,按照我们前面的经验,一个theme有多个product,那么自然在product表中就会有theme_id字段,但是通过观察数据表我们发现并没有,这是因为theme表与product表有着特殊的关系。前面轮播图管理接口,一个轮播图对应了多个轮播图元素,轮播图元素只属于一个轮播图,是一种一对多的关系,所以可以通过在banner_item表中定义一个banner_id字段来体现与banner表的关系。但是theme和product则不一样,一个theme可以拥有多个product,同样,一个product也可以属于多个theme,比如我们现在有两个主题,一个叫世界上最好吃的水果,另一个叫热带水果,这两个主题有很多水果,而且两个主题都包含了同一种水果——菠萝,这种关联关系我们就称为多对多。按照目前的知识储备,我们用最简单粗暴的方法,我们可能会在theme表或者product表定义个字段,这个字段存放一个字符串数据,由theme表记录或者product表记录的id组成,可以实现吗?当然可以,但是你会发现当你要查询这部分数据的时候,你会非常麻烦,首先解析一下字段内容,然后来个for循环,至于修改和新增、删除的代码量就不敢想下去了。所以,对于存在多对多关联关系的表,我们使用中间表来实现定义和各种操作,即数据库中的theme_product表,中间表中只有两个字段theme_id和product_id,通过操作中间表,我们就可以灵活的定义一个主题下有什么商品,或者商品属于什么主题,这也是目前主流的处理多对多关系表的方式。
在了解了theme表和product表的关系之后,我们就需要在模型中去定义两个模型的关系了,进入到模型层下的Theme模型类,新增一个声明关联关系的方法:
<?php


namespace app\api\model;


use think\Model;

class Theme extends Model
{
    protected $hidden = ['topic_img_id', 'head_img_id', 'delete_time', 'update_time'];


    public function products()
    {
        // 等价于 return $this->belongsToMany('Product', 'theme_product', 'product_id', 'theme_id');
        return $this->belongsToMany('Product');
    }

    public function topicImg(){...}

    public function headImg(){...}
}
2
3
4
5
6
7
8
9
10
11
12
13
14
15
16
17
18
19
20
21
22
23
这里我们定义了一个products()方法来声明两个模型的关联关系,这里使用TP5内置的belongsToMany()方法,这个方法用于定义多对多的关联关系,第一参数指定要关联的模型,第二个参数指定中间表的表名,默认是当前模型名+_要关联的模型名,第三个参数是中间表中关联模型的外键名,默认外键名是关联模型名+_id,第四个参数是当前模型关联键名,默认是当前模型名+_id,由于我们中间表字段名设计的时候已经考虑到了这个默认规则,所以这里我们定义的时候可以直接省略后面三个参数的定义。
这里读者可能理解不了这个方法第三个和第四个参数的含义,通俗点来说就是告诉框架theme表和product表的id分别对应到中间表中哪个字段。更多关于TP5多对多模型的内容点击查看
这里我们还需要创建一下Product模型,同样在模型层下新增一个Product模型类:
<?php


namespace app\api\model;


class Product extends Model
{

}
2
3
4
5
6
7
8
9
10
11
定义完模型之后,我们就可以来控制器方法中调用了,回到Theme模型类下的getThemeById()方法:
<?php


namespace app\api\controller\v1;

use app\api\model\Theme as ThemeModel;
use app\lib\exception\theme\ThemeException;

class Theme
{

    public function getSimpleList(){...}

    /**
     * 查询指定主题详情
     * @param('id','精选主题id','require|number')
     */
    public function getThemeById($id)
    {
        $theme = ThemeModel::with('topicImg,headImg,products')->get($id);
        return $theme;
    }
}
2
3
4
5
6
7
8
9
10
11
12
13
14
15
16
17
18
19
20
21
22
23
熟悉的代码,通过调用with()方法并传入关联定义的方法名来实现关联查询,这里我们顺带复用了前面两个关于图片的关联模型来查询出主题图和头图的url,就这么简单。最后一步就是为这个接口定义一条路由了,打开路由配置文件route.php,在theme路由分组下我们新增一条路由:
Route::group('', function () {
    Route::group('cms', function () {
        // CMS管理相关的路由规则
        // 内容省略。。。。
    });
    Route::group('v1', function () {
        // 业务接口相关的路由规则
        ............................
        Route::group('theme',function(){
            Route::get('','api/v1.Theme/getSimpleList');
            Route::get(':id','api/v1.Theme/getThemeById');
        });
    });
})->middleware(['Auth','ReflexValidate'])->allowCrossDomain();
2
3
4
5
6
7
8
9
10
11
12
13
14
这里我们定义了一条GET请求,要求在url中要传递一个id参数,url要执行的方法就是我们的getThemeById()方法。定义完后让我们到Postman中来验证一下,打开Postman,新增一个名为查询指定主题详情的GET请求,这里我们查询id为1的主题:
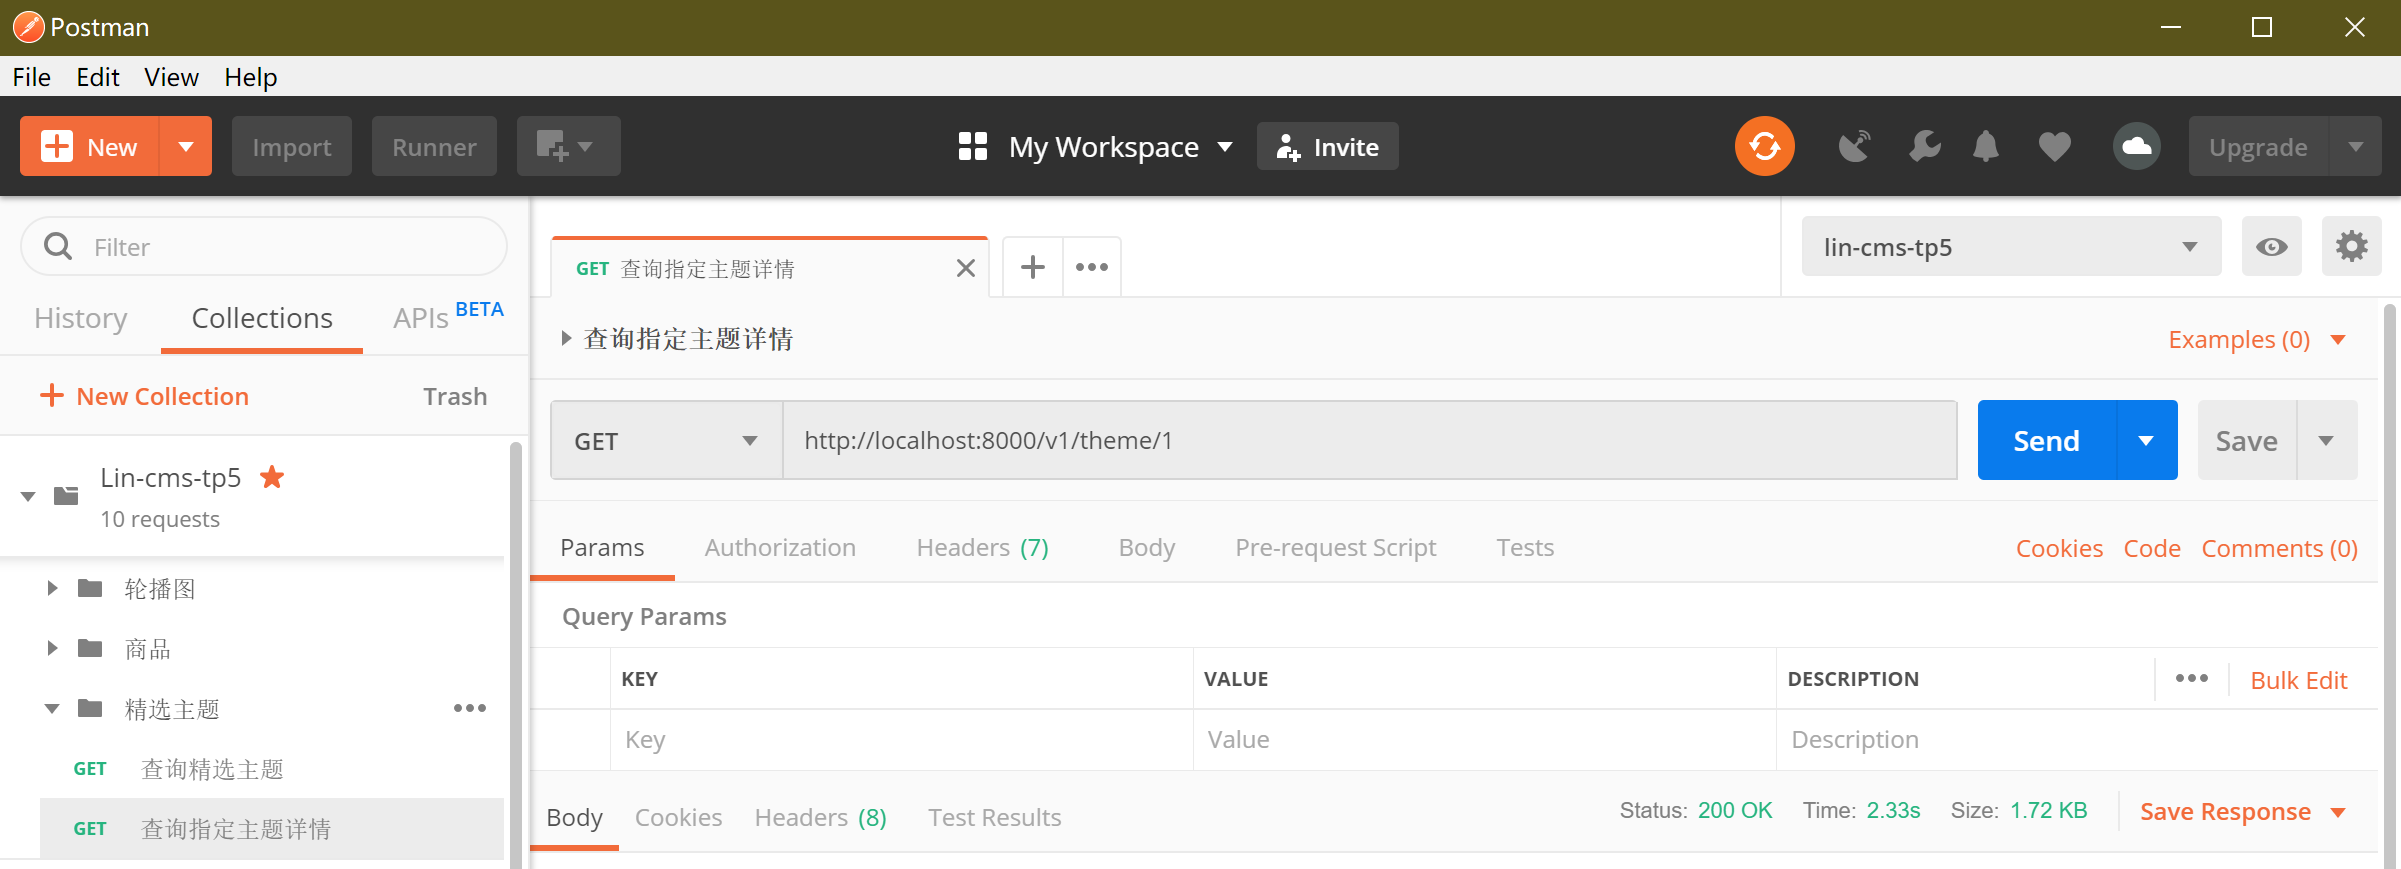
发送请求,返回结果:
{
    "id": 1,
    "name": "专题栏位一",
    "description": "美味水果世界",
    "topic_img": {
        "id": 16,
        "url": "http://localhost:8000/images/1@theme.png"
    },
    "head_img": {
        "id": 49,
        "url": "http://localhost:8000/images/1@theme-head.png"
    },
    "products": [
        {
            "id": 2,
            "name": "梨花带雨 3个",
            "price": "0.01",
            "stock": 984,
            "delete_time": null,
            "category_id": 2,
            "main_img_url": "/product-dryfruit@1.png",
            "from": 1,
            "create_time": null,
            "update_time": null,
            "summary": null,
            "img_id": 10,
            "pivot": {
                "theme_id": 1,
                "product_id": 2
            }
        },
        {
            "id": 5,
            "name": "春生龙眼 500克",
            "price": "0.01",
            "stock": 995,
            "delete_time": null,
            "category_id": 2,
            "main_img_url": "/product-dryfruit@2.png",
            "from": 1,
            "create_time": null,
            "update_time": null,
            "summary": null,
            "img_id": 33,
            "pivot": {
                "theme_id": 1,
                "product_id": 5
            }
        },
        {
            "id": 8,
            "name": "夏日芒果 3个",
            "price": "0.01",
            "stock": 995,
            "delete_time": null,
            "category_id": 2,
            "main_img_url": "/product-dryfruit@3.png",
            "from": 1,
            "create_time": null,
            "update_time": null,
            "summary": null,
            "img_id": 36,
            "pivot": {
                "theme_id": 1,
                "product_id": 8
            }
        },
        {
            "id": 10,
            "name": "万紫千凤梨 300克",
            "price": "0.01",
            "stock": 996,
            "delete_time": null,
            "category_id": 2,
            "main_img_url": "/product-dryfruit@5.png",
            "from": 1,
            "create_time": null,
            "update_time": null,
            "summary": null,
            "img_id": 38,
            "pivot": {
                "theme_id": 1,
                "product_id": 10
            }
        },
        {
            "id": 12,
            "name": "珍奇异果 3个",
            "price": "0.01",
            "stock": 999,
            "delete_time": null,
            "category_id": 2,
            "main_img_url": "/product-dryfruit@7.png",
            "from": 1,
            "create_time": null,
            "update_time": null,
            "summary": null,
            "img_id": 40,
            "pivot": {
                "theme_id": 1,
                "product_id": 12
            }
        }
    ]
}
2
3
4
5
6
7
8
9
10
11
12
13
14
15
16
17
18
19
20
21
22
23
24
25
26
27
28
29
30
31
32
33
34
35
36
37
38
39
40
41
42
43
44
45
46
47
48
49
50
51
52
53
54
55
56
57
58
59
60
61
62
63
64
65
66
67
68
69
70
71
72
73
74
75
76
77
78
79
80
81
82
83
84
85
86
87
88
89
90
91
92
93
94
95
96
97
98
99
100
101
102
103
104
105
没有报错,这里我们顺利的查询了id为1的主题和主题内包含的商品,但是这里仔细观察会发现这里又出现了前面的老问题,而且稍微情况有点不一样,在返回的products关联数据中有个main_img_url字段,是图片的相对路径。然后又有一个img_id字段,通过数据库里比对我们还发现这个main_img_url的值就是image表里img_id对应那条记录的值,这里重复存储了两个本质上是一样的东西,这种行为有个专门的称呼叫数据冗余(大白话就是有两个字段存储了同样的东西,这不就多余了)。熟悉数据库设计的读者应该知道,我们在数据库设计的时候是要尽量避免出现数据冗余,但这里却反范式的冗余了一个字段,这么做当然是有目的的,这里其实是为了方便查询和节省点性能开销。通过前面小节的学习内容可以知道,我们经常会使用到模型的关联来实现关联查询,当我们的查询内容比较简单的时候,查询是很方便的,性能问题也不大。但是当查询内容比较复杂,比如说跨了好几张表,数据量比较大等,这时候查询起来就会很麻烦而且很消耗性能。product商品表在项目中是一个基础而且核心的表,有很多其他的表与之关联,这里设计了一个冗余字段main_img_url的目的就是为了当其他模型在做关联查询商品的时候,可以少一次关联查询image表(多数情况下需要查询出商品的同时也要展示商品的图片)。所以这里,我们仅需要给Product模型定义一个获取器,把main_img_url的值拼接完整,打开Product模型类:
<?php


namespace app\api\model;


use think\Model;

class Product extends Model
{
    public function getMainImgUrlAttr($value, $data)
    {

    }
}
2
3
4
5
6
7
8
9
10
11
12
13
14
15
图片完整路径拼接的实现前面我们已经在Image模型中实现了,同样是利用获取器,但是这里就有个问题了,我们使用CV大法(复制粘贴)可以吗?可以,但是,如果我们还有其他表也存在这种冗余设计,我们就又要再复制粘贴一次,这不符合我们面向对象的编程思想(气势要有)。既然这个方法可能需要重复利用,那我们就把具体的实现封装成一个方法,其他地方能调用到就可以了。这么做,在模型层目录下面,我们新建一个BaseModel类,让其继承Model,并增加一个prefixImgUrl()方法:
<?php

namespace app\api\model;


use think\Model;

class BaseModel extends Model
{
    // 我们要获取url这个字段,获取默认接收两个参数
    // $value是当前这条记录里url字段的值
    // $data是当前记录的完整数据
    protected function  prefixImgUrl($value, $data){
        $finalUrl = $value;
        // 根据表的注释,1来自本地,2来自公网
        if($data['from'] == 1){// 如果来自本地,把本机的存放图片目录的域名地址跟$value拼接
            // 这里我们把本机的存放图片目录的域名地址写到了一个配置文件里。
            // 后续我们可能换了域名或者目录,又或者有其他来源渠道,以配置文件的形式这样以后只需改配置文件而不必改动代码
            $finalUrl = config('setting.img_prefix').$value;
        }
        // 这里如果from不是来自本地,那么存储的会是一个完整的公网访问地址,无需处理
        // 返回处理后的url
        return $finalUrl;
    }
}
2
3
4
5
6
7
8
9
10
11
12
13
14
15
16
17
18
19
20
21
22
23
24
25
这里我们把原来Image模型的url获取器里的实现粘贴了过来,这么做实现的原理就是通过BaseModel类继承Model类,然后我们自己定义的模型类全部改为继承BaseModel,利用类的继承特性,我们的模型除了可以调用到Model类的方法还可以调用BaseModel类里的方法。
这里由于拼接完整url的实现已经放到了BaseModel类中了,那我们Image模型的获取器就要修改下了:
<?php


namespace app\api\model;


class Image extends BaseModel
{
    protected $hidden = ['delete_time', 'from'];


    public function getUrlAttr($value, $data)
    {
        return $this->prefixImgUrl($value, $data);
    }
}
2
3
4
5
6
7
8
9
10
11
12
13
14
15
16
17
这里我们首先让模型继承我们的BaseModel类,然后通过$this->调用父类里的prefixImgUrl()方法,这样原来关联了Image模型的关联查询一样可以实现原有的效果。
有了这个封装,让我们回到Product模型类中,这时候只需要同样让模型继承BaseModel类,然后在getMainImgUrlAttr()获取器方法中同样调用一下父类的prefixImgUrl()方法:
<?php


namespace app\api\model;


class Product extends BaseModel
{
    public function getMainImgUrlAttr($value, $data)
    {
        return $this->prefixImgUrl($value, $data);

    }
}
2
3
4
5
6
7
8
9
10
11
12
13
14
15
修改好之后,让我们再次调用接口:
{
    "id": 1,
    "name": "专题栏位一",
    "description": "美味水果世界",
    "topic_img": {
        "id": 16,
        "url": "http://localhost:8000/images/1@theme.png"
    },
    "head_img": {
        "id": 49,
        "url": "http://localhost:8000/images/1@theme-head.png"
    },
    "products": [
        {
            "id": 2,
            "name": "梨花带雨 3个",
            "price": "0.01",
            "stock": 984,
            "delete_time": null,
            "category_id": 2,
            "main_img_url": "http://localhost:8000/images/product-dryfruit@1.png",
            "from": 1,
            "create_time": null,
            "update_time": null,
            "summary": null,
            "img_id": 10,
            "pivot": {
                "theme_id": 1,
                "product_id": 2
            }
        },
        {
            "id": 5,
            "name": "春生龙眼 500克",
            "price": "0.01",
            "stock": 995,
            "delete_time": null,
            "category_id": 2,
            "main_img_url": "http://localhost:8000/images/product-dryfruit@2.png",
            "from": 1,
            "create_time": null,
            "update_time": null,
            "summary": null,
            "img_id": 33,
            "pivot": {
                "theme_id": 1,
                "product_id": 5
            }
        },
        {
            "id": 8,
            "name": "夏日芒果 3个",
            "price": "0.01",
            "stock": 995,
            "delete_time": null,
            "category_id": 2,
            "main_img_url": "http://localhost:8000/images/product-dryfruit@3.png",
            "from": 1,
            "create_time": null,
            "update_time": null,
            "summary": null,
            "img_id": 36,
            "pivot": {
                "theme_id": 1,
                "product_id": 8
            }
        },
        {
            "id": 10,
            "name": "万紫千凤梨 300克",
            "price": "0.01",
            "stock": 996,
            "delete_time": null,
            "category_id": 2,
            "main_img_url": "http://localhost:8000/images/product-dryfruit@5.png",
            "from": 1,
            "create_time": null,
            "update_time": null,
            "summary": null,
            "img_id": 38,
            "pivot": {
                "theme_id": 1,
                "product_id": 10
            }
        },
        {
            "id": 12,
            "name": "珍奇异果 3个",
            "price": "0.01",
            "stock": 999,
            "delete_time": null,
            "category_id": 2,
            "main_img_url": "http://localhost:8000/images/product-dryfruit@7.png",
            "from": 1,
            "create_time": null,
            "update_time": null,
            "summary": null,
            "img_id": 40,
            "pivot": {
                "theme_id": 1,
                "product_id": 12
            }
        }
    ]
}
2
3
4
5
6
7
8
9
10
11
12
13
14
15
16
17
18
19
20
21
22
23
24
25
26
27
28
29
30
31
32
33
34
35
36
37
38
39
40
41
42
43
44
45
46
47
48
49
50
51
52
53
54
55
56
57
58
59
60
61
62
63
64
65
66
67
68
69
70
71
72
73
74
75
76
77
78
79
80
81
82
83
84
85
86
87
88
89
90
91
92
93
94
95
96
97
98
99
100
101
102
103
104
105
这样我们就得到了一个完整的图片url了,鉴于我们以后可能还有会其他类似的复用需求,请读者们自行把前面已经创建的几个模型类也都修改成继承BaseModel,有需要的时候把封装了的方法放置在这个类中让我们自定义的模型类调用即可。
扩展知识:
数据库范式设计无论从使用、维护、性能都有很大帮助,推荐读者学习并运用到实际工作中去。但这里要说明一点的是,过分的强调范式设计反而会导致你实现某些复杂条件查询时困难度上升,为了克服这个困难你可能会采用了其他低效的手段来实现,这就与使用范式设计的初衷相违背了,所以当我们在设计数据库表的时候,在经过明确思考和评估之后是允许适当做一些反范式设计的。
# 新增精选主题
本小节我们来动手实现一个新增主题的接口,按照目前的知识储备,我们已经可以轻松的实现这个接口了,老套路,在Theme控制器类下新增addTheme()控制器方法:
<?php


namespace app\api\controller\v1;

use app\api\model\Theme as ThemeModel;
use app\lib\exception\theme\ThemeException;
use think\facade\Request;

class Theme
{
    /**查询所有精选主题*/
    public function getSimpleList(){...}

    /**查询指定主题详情*/
    public function getThemeById($id){...}


    /**
     * 新增精选主题
     * @validate('ThemeForm')
     * @throws ThemeException
     */
    public function addTheme()
    {
        // 获取post请求参数内容
        $params = Request::post();
        // 调用模型的create()方法创建theme表记录,内容是获取到的参数内容,并仅允许写入数据表定义的字段数据
        $theme = ThemeModel::create($params, true);
        if ($theme->isEmpty()) {
            throw new ThemeException([
                'msg' => '精选主题新增失败'
            ]);
        }
        return writeJson(201, ['id' => $theme->id], '精选主题新增成功!');
    }
}
2
3
4
5
6
7
8
9
10
11
12
13
14
15
16
17
18
19
20
21
22
23
24
25
26
27
28
29
30
31
32
33
34
35
36
37
这里我们熟练的获取了前端提交的参数并调用ThemeModel的静态方法create()来新增一个精选主题。create()方法成功时返回的是模型的对象实例,这里我们调用实例内置的isEmpty()方法来检测下这次新增操作是否成功,最后我们会在返回的提示信息中增加一个创建后主题的id。同时我们给这个接口定义了一个注解验证器,调用的是ThemeForm自定义验证器类,这里我们需要创建一下这个类,在项目根目录下的application\api\validate创建一个新的文件夹theme,在theme文件下新建一个ThemeForm.php文件,实现下验证规则:
<?php


namespace app\api\validate\theme;


use LinCmsTp5\validate\BaseValidate;

class ThemeForm extends BaseValidate
{
    protected $rule = [
        'name' => 'require|chsDash',
        'description' => 'require|chsDash',
        'topic_img_id' => 'require|number',
        'head_img_id' => 'require|number'
    ];
}
2
3
4
5
6
7
8
9
10
11
12
13
14
15
16
17
这里我们要求新增精选主题接口必须提交4个参数。定义完之后,就是加个路由规则了,打开路由配置文件,添加一条路由:
Route::group('', function () {
    Route::group('cms', function () {
        // CMS管理相关的路由规则
        // 内容省略。。。。
    });
    Route::group('v1', function () {
        // 业务接口相关的路由规则
        ............................
        Route::group('theme',function(){
            Route::get('','api/v1.Theme/getSimpleList');
            Route::get(':id','api/v1.Theme/getThemeById');
            Route::post('','api/v1.Theme/addTheme');
        });
    });
})->middleware(['Auth','ReflexValidate'])->allowCrossDomain();
2
3
4
5
6
7
8
9
10
11
12
13
14
15
这里我们在theme分组路由下定义了一条请求类型为POST的路由,对应到控制器addTheme()。路由定义完之后,打开Postman,新建一个名叫新增精选主题的POST请求,并根据接口要求填入一些测试参数:
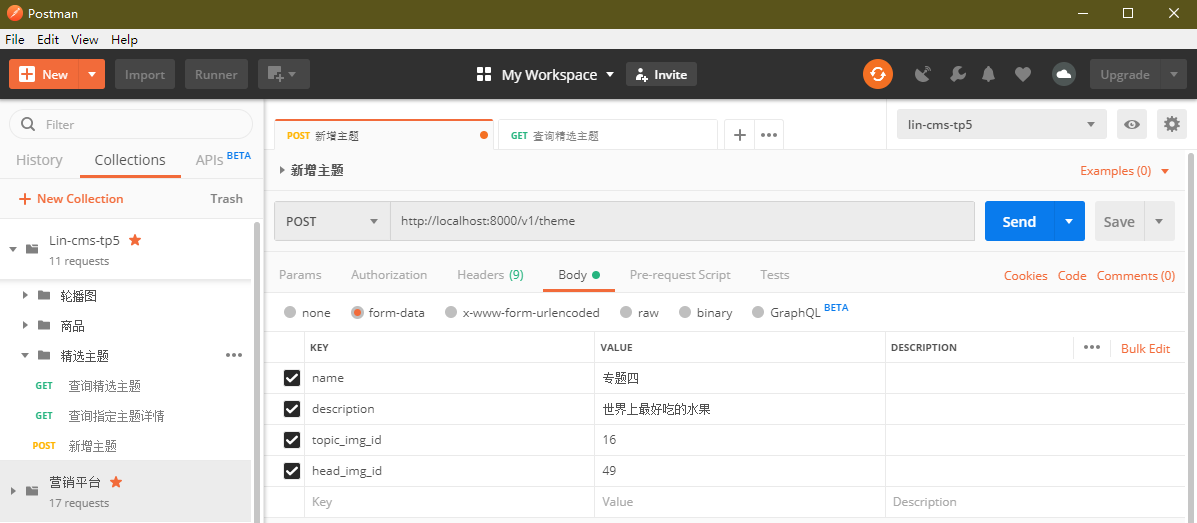
这里我们随便给4个参数传递一些值,然后点击发送,得到结果:
{
    "error_code": 0,
    "result": [],
    "msg": "精选主题新增成功!"
}
2
3
4
5
接口提示我们新增成功了,然后我们再调用一下查询所有精选主题:
[
    {
        "id": 1,
        "name": "专题栏位一",
        "description": "美味水果世界",
        "topic_img": {
            "id": 16,
            "url": "http://localhost:8000/images/1@theme.png"
        },
        "head_img": {
            "id": 49,
            "url": "http://localhost:8000/images/1@theme-head.png"
        }
    },
    {
        "id": 2,
        "name": "专题栏位二",
        "description": "新品推荐",
        "topic_img": {
            "id": 17,
            "url": "http://localhost:8000/images/2@theme.png"
        },
        "head_img": {
            "id": 50,
            "url": "http://localhost:8000/images/2@theme-head.png"
        }
    },
    {
        "id": 3,
        "name": "专题栏位三",
        "description": "做个干物女",
        "topic_img": {
            "id": 18,
            "url": "http://localhost:8000/images/3@theme.png"
        },
        "head_img": {
            "id": 18,
            "url": "http://localhost:8000/images/3@theme.png"
        }
    },
    {
        "id": 4,
        "name": "专题四",
        "description": "世界上最好吃的水果",
        "topic_img": {
            "id": 16,
            "url": "http://localhost:8000/images/1@theme.png"
        },
        "head_img": {
            "id": 49,
            "url": "http://localhost:8000/images/1@theme-head.png"
        }
    }
]
2
3
4
5
6
7
8
9
10
11
12
13
14
15
16
17
18
19
20
21
22
23
24
25
26
27
28
29
30
31
32
33
34
35
36
37
38
39
40
41
42
43
44
45
46
47
48
49
50
51
52
53
54
可以看到现在已经新增了一个id为4的精选主题了,说明我们刚刚调用的新增精选主题接口是正常生效了的。
# 删除精选主题
正当我们沉迷于新建精选主题中无法自拔的时候,我们又再一次产生了大量测试数据,是时候清理一下了,我们来造一个删除精选主题的接口,实现的方法也非常简单,在Theme控制器类下新增delTheme()控制器方法:
<?php


namespace app\api\controller\v1;

use app\api\model\Theme as ThemeModel;
use app\lib\exception\theme\ThemeException;
use think\facade\Hook;
use think\facade\Request;

class Theme
{
    /**查询所有精选主题*/
    public function getSimpleList(){...}
    /**查询指定主题详情*/
    public function getThemeById($id){...}
    /** 新增精选主题*/
    public function addTheme(){}
    /**
     * @auth('删除精选主题','精选主题管理')
     * @param('ids','待删除的主题id数组','require|array|min:1')
     */
    public function delTheme()
    {
        $ids = Request::delete('ids');
        // 调用模型内封装好的方法
        $res = ThemeModel::delTheme($ids);
        if (!$res) throw new ThemeException(['msg' => '精选主题删除失败']);
        // 记录本次行为的日志
        Hook::listen('logger', '删除了id为' . implode(',', $ids) . '的精选主题');
        return writeJson(201, [], '精选主题删除成功!');
    }
}
2
3
4
5
6
7
8
9
10
11
12
13
14
15
16
17
18
19
20
21
22
23
24
25
26
27
28
29
30
31
32
33
这里我们按照套路,给删除这种敏感操作增加了接口权限控制、参数校验、还有行为日志记录。同时我们在Theme模型下封装了一个静态方法delTheme(),在方法里面去实现删除的逻辑并返回执行的结果。这里我们来实现一下这个方法,打开Theme模型类,新增一个delTheme()方法:
<?php


namespace app\api\model;

use think\Db;
use think\Exception;
use think\Model;
use think\model\concern\SoftDelete;

class Theme extends Model
{
    use SoftDelete;
    protected $hidden = ['topic_img_id', 'head_img_id', 'delete_time', 'update_time'];

    /**
     * @param $ids
     * @return bool
     */
    public static function delTheme($ids)
    {
        // 开启事务
        Db::startTrans();
        try {
            // 对theme表记录做软删除
            self::destroy($ids);
            // 删除中间表中对应主题id的记录,注意这里是执行硬删除
            foreach ($ids as $id) {
                // 条件查询,theme_id字段等于$id的记录
                ThemeProduct::where('theme_id', $id)->delete();
            }
            Db::commit();
            return true;
        } catch (Exception $ex) {
            Db::rollback();
            return false;
        }
    }

    public function products(){...}

    public function topicImg(){...}

    public function headImg(){...}
}
2
3
4
5
6
7
8
9
10
11
12
13
14
15
16
17
18
19
20
21
22
23
24
25
26
27
28
29
30
31
32
33
34
35
36
37
38
39
40
41
42
43
44
45
在delTheme()方法中,我们先使用模型内置的destroy()方法对theme表的记录进行软删除,注意这里要在模型类里添加use SoftDelete不然软删除不会生效。接着我们使用一个foreach循环删除中间表中theme_id等于$id的记录,这样商品就不会再与这个已经删除的主题关联了,同时这里我们启用了一个事务来保证数据一致性,如果整个过程没有异常我们就提交事务并返回一个true,反之回滚事务并返回一个false。这里我们需要新增一个ThemeProduct模型类:
<?php


namespace app\api\model;


use think\Model;

class ThemeProduct extends Model
{

}
2
3
4
5
6
7
8
9
10
11
12
中间表一般情况下无软删除的需求,所以这里我们没有在中间表的模型中使用use SoftDelete。
模型方法定义好之后,我们就可以来测试一下这个接口是否能正常工作了,打开路由配置文件route.php,在theme路由分组下我们新增一条路由规则:
Route::group('', function () {
    Route::group('cms', function () {
        // CMS管理相关的路由规则
        // 内容省略。。。。
    });
    Route::group('v1', function () {
        // 业务接口相关的路由规则
        ............................
        Route::group('theme',function(){
            Route::get('','api/v1.Theme/getSimpleList');
            Route::get(':id','api/v1.Theme/getThemeById');
            Route::post('','api/v1.Theme/addTheme');
            Route::delete('','api/v1.Theme/delTheme');
        });
    });
})->middleware(['Auth','ReflexValidate'])->allowCrossDomain();
2
3
4
5
6
7
8
9
10
11
12
13
14
15
16
常规操作,定义一条DELETE类型的请求,对应到我们Theme控制器类下的delTheme()方法。接着到Postman中新增一个名为删除精选主题的请求并填写相应的地址和参数:
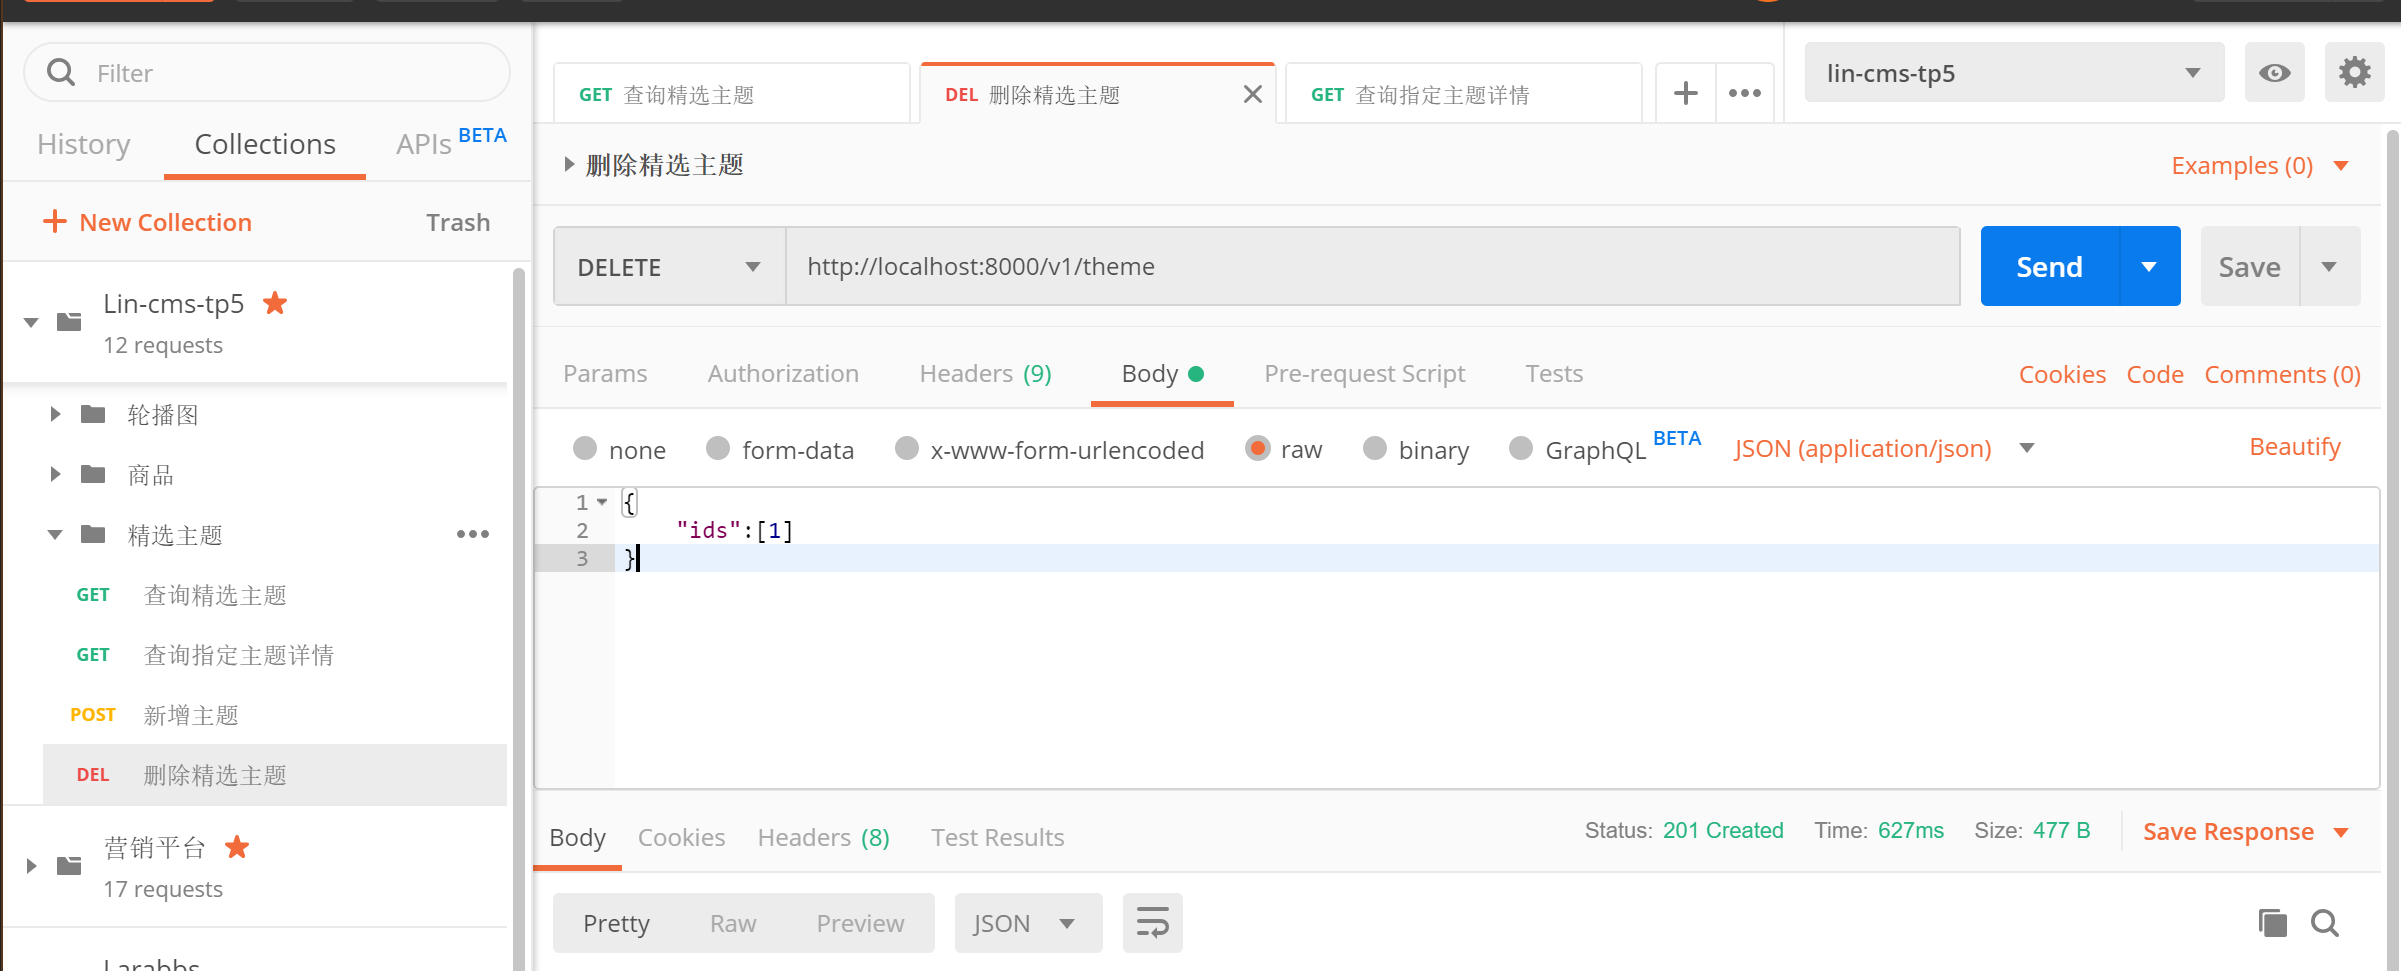
这里我们尝试删除一个id为1的精选主题,点击发送:
{
    "error_code": 0,
    "result": [],
    "msg": "精选主题删除成功!"
}
2
3
4
5
没有报错,读者可以尝试调用一下我们前面已经实现了的查询所有精选主题接口或者查询指定精选主题接口,你会发现这时候已经查询不到id为1的精选主题了,同时检查数据库中的theme_product表,theme_id为1的记录也不存在了。
# 编辑精选主题
本小节我们来实现编辑精选主题接口,和之前的编辑轮播图接口一样,我们编辑精选主题的时候一样会涉及到编辑精选主题信息、新增主题关联商品和移除主题关联商品的情况,所以我们采用同样的思路,把编辑精选主题接口细分成三个小接口,打开控制层下的Theme控制器类,新增三个控制器方法:
<?php


namespace app\api\controller\v1;

use app\api\model\Theme as ThemeModel;
use app\lib\exception\theme\ThemeException;
use think\facade\Hook;
use think\facade\Request;

class Theme
{
    /**查询所有精选主题*/
    public function getSimpleList(){...}
    /**查询指定主题详情*/
    public function getThemeById($id){...}
    /**新增精选主题*/
    public function addTheme(){}
    /**删除精选主题*/
    public function delTheme(){...}

    /**
     * 更新精选主题信息
     * @validate('ThemeForm.edit')
     */
    public function updateThemeInfo($id)
    {
        $themeInfo = Request::patch();
        $theme = ThemeModel::get($id);
        if (!$theme) throw new ThemeException(['msg' => '指定的主题不存在']);
        $theme->save($themeInfo);

        return writeJson(201, [], '精选主题基础信息更新成功!');
    }

    /**
     * 移除精选主题关联商品
     * @param('id','精选主题id','require|number')
     * @param('products','商品id列表','require|array|min:1')
     */
    public function removeThemeProduct($id)
    {
        $products = Request::post('products');
        $theme = ThemeModel::get($id);
        if (!$theme) throw new ThemeException(['msg' => '指定的主题不存在']);
        $theme->products()->detach($products);

        return writeJson(201, [], '精选专题删除商品成功');
    }

    /**
     * 新增精选主题关联商品
     * @param('id','精选主题id','require|number')
     * @param('products','商品id列表','require|array|min:1')
     */
    public function addThemeProduct($id)
    {
        $products = Request::post('products');
        $theme = ThemeModel::get($id);
        if (!$theme) throw new ThemeException(['msg' => '指定的主题不存在']);
        $theme->products()->saveAll($products);

        return writeJson(201, [], '精选专题新增商品成功');
    }
2
3
4
5
6
7
8
9
10
11
12
13
14
15
16
17
18
19
20
21
22
23
24
25
26
27
28
29
30
31
32
33
34
35
36
37
38
39
40
41
42
43
44
45
46
47
48
49
50
51
52
53
54
55
56
57
58
59
60
61
62
63
64
65
这里我们通过updateThemeInfo()、removeThemeProduct()、addThemeProduct()三个方法来实现修改主题信息、精选主题关联商品的新增和移除,方法内的代码逻辑都非常简单,相信读者已经能够自行阅读并理解,但这里作者还是带着读者来过一遍:
- updateThemeInfo()
/**
     * 更新精选主题信息
     * @validate('ThemeForm.edit')
     */
    public function updateThemeInfo($id)
    {
        $themeInfo = Request::patch();
        $theme = ThemeModel::get($id);
        if (!$theme) throw new ThemeException(['msg' => '指定的主题不存在']);
        $theme->save($themeInfo);

        return writeJson(201, [], '精选主题基础信息更新成功!');
    }
2
3
4
5
6
7
8
9
10
11
12
13
这个控制器方法用于实现更新精选主题的基础信息,这里我们再次用到了场景验证功能,由于之前我们在新增精选主题接口实现的自定义验证器没有配置场景规则,所以这里我们要修改一下ThemeForm这个自定义验证器类,定位到我们的验证器存放目录,打开ThemeForm.php文件,修改如下:
<?php


namespace app\api\validate\theme;


use LinCmsTp5\validate\BaseValidate;

class ThemeForm extends BaseValidate
{
    protected $rule = [
        'name' => 'require|chsDash',
        'description' => 'require|chsDash',
        'topic_img_id' => 'require|number',
        'head_img_id' => 'require|number'
    ];

    public function sceneEdit()
    {
        return $this->remove('name', 'require')
            ->remove('description', 'require')
            ->remove('topic_img_id', 'require')
            ->remove('head_img_id', 'require');
    }
}
2
3
4
5
6
7
8
9
10
11
12
13
14
15
16
17
18
19
20
21
22
23
24
25
这里我们定义了一个名叫edit场景,当触发这个场景时,我们移除4个参数原来里面的必传规则,只保留参数类型的验证。这样子就可以和新增精选主题时的参数校验方式区分开来。自定义验证器修改好之后,回到我们控制器方法中,接下来的代码就是很简单的查询出指定的精选主题并把参数传递给模型方法save()实现字段更新。
- removeThemeProduct()
/**
     * 移除精选主题关联商品
     * @param('id','精选主题id','require|number')
     * @param('products','商品id列表','require|array|min:1')
     */
    public function removeThemeProduct($id)
    {
        $products = Request::post('products');
        $theme = ThemeModel::get($id);
        if (!$theme) throw new ThemeException(['msg' => '指定的主题不存在']);
        $theme->products()->detach($products);

        return writeJson(201, [], '精选专题删除商品成功');
    }
2
3
4
5
6
7
8
9
10
11
12
13
14
这个控制器方法用于实现从精选主题中移除某个商品的关联,这里我们使用注解参数验证,要求传递一个精选主题的id和一个由商品id组成的数组。由于之前我们通过在Theme模型类下定义了一个products()方法声明了主题表和商品表的多对多关系,所以这里我们可以使用$theme->products()->detach($products)这种方式,框架会自动帮我们直接删除中间表中theme_id为$id,product_id为$products数组内元素值的记录。
- addThemeProduct()
    /**
     * 新增精选主题关联商品
     * @param('id','精选主题id','require|number')
     * @param('products','商品id列表','require|array|min:1')
     */
    public function addThemeProduct($id)
    {
        $products = Request::post('products');
        $theme = ThemeModel::get($id);
        if (!$theme) throw new ThemeException(['msg' => '指定的主题不存在']);
        $theme->products()->saveAll($products);

        return writeJson(201, [], '精选专题新增商品成功');
    }
2
3
4
5
6
7
8
9
10
11
12
13
14
这个控制器方法用于实现新增商品关联到指定的精选主题中,这里我们同样使用了注解参数验证,要求传递一个精选主题的id和一个由商品id组成的数组。同样借助之前Theme模型类下定义的products()方法,实现中间表的记录插入。
认识完几个控制器方法之后,我们就可以来定义路由了,打开route.php文件,在theme路由分组下新增三条路由规则:
Route::group('', function () {
    Route::group('cms', function () {
        // CMS管理相关的路由规则
        // 内容省略。。。。
    });
    Route::group('v1', function () {
        // 业务接口相关的路由规则
        ............................
        Route::group('theme',function(){
            Route::get('','api/v1.Theme/getSimpleList');
            Route::get(':id','api/v1.Theme/getThemeById');
            Route::post('','api/v1.Theme/addTheme');
            Route::delete('','api/v1.Theme/delTheme');
             // 编辑精选主题信息
            Route::patch(':id','api/v1.Theme/updateThemeInfo');
            // 移除精选主题关联商品
            Route::delete('product/:id','api/v1.Theme/removeThemeProduct');
            // 新增精选主题关联商品
            Route::post('product/:id','api/v1.Theme/addThemeProduct');
        });
    });
})->middleware(['Auth','ReflexValidate'])->allowCrossDomain();
2
3
4
5
6
7
8
9
10
11
12
13
14
15
16
17
18
19
20
21
22
路由定义完之后我们就可以来测试一下,打开Postman,在精选主题分组下新增3个请求,对应我们刚刚定义的路由规则:
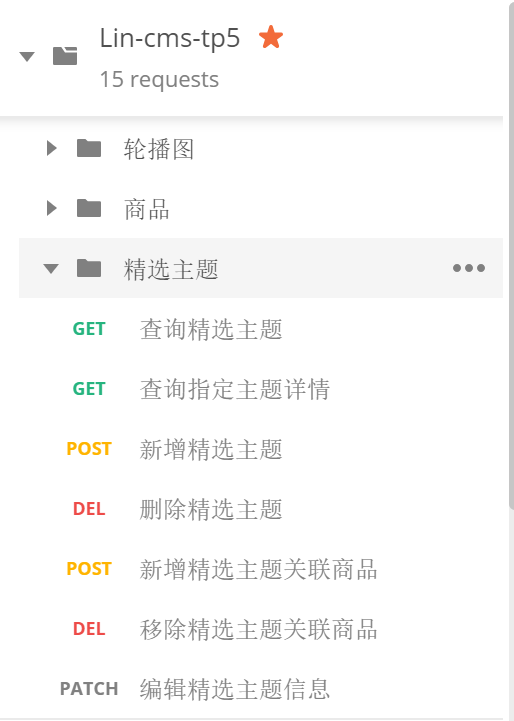
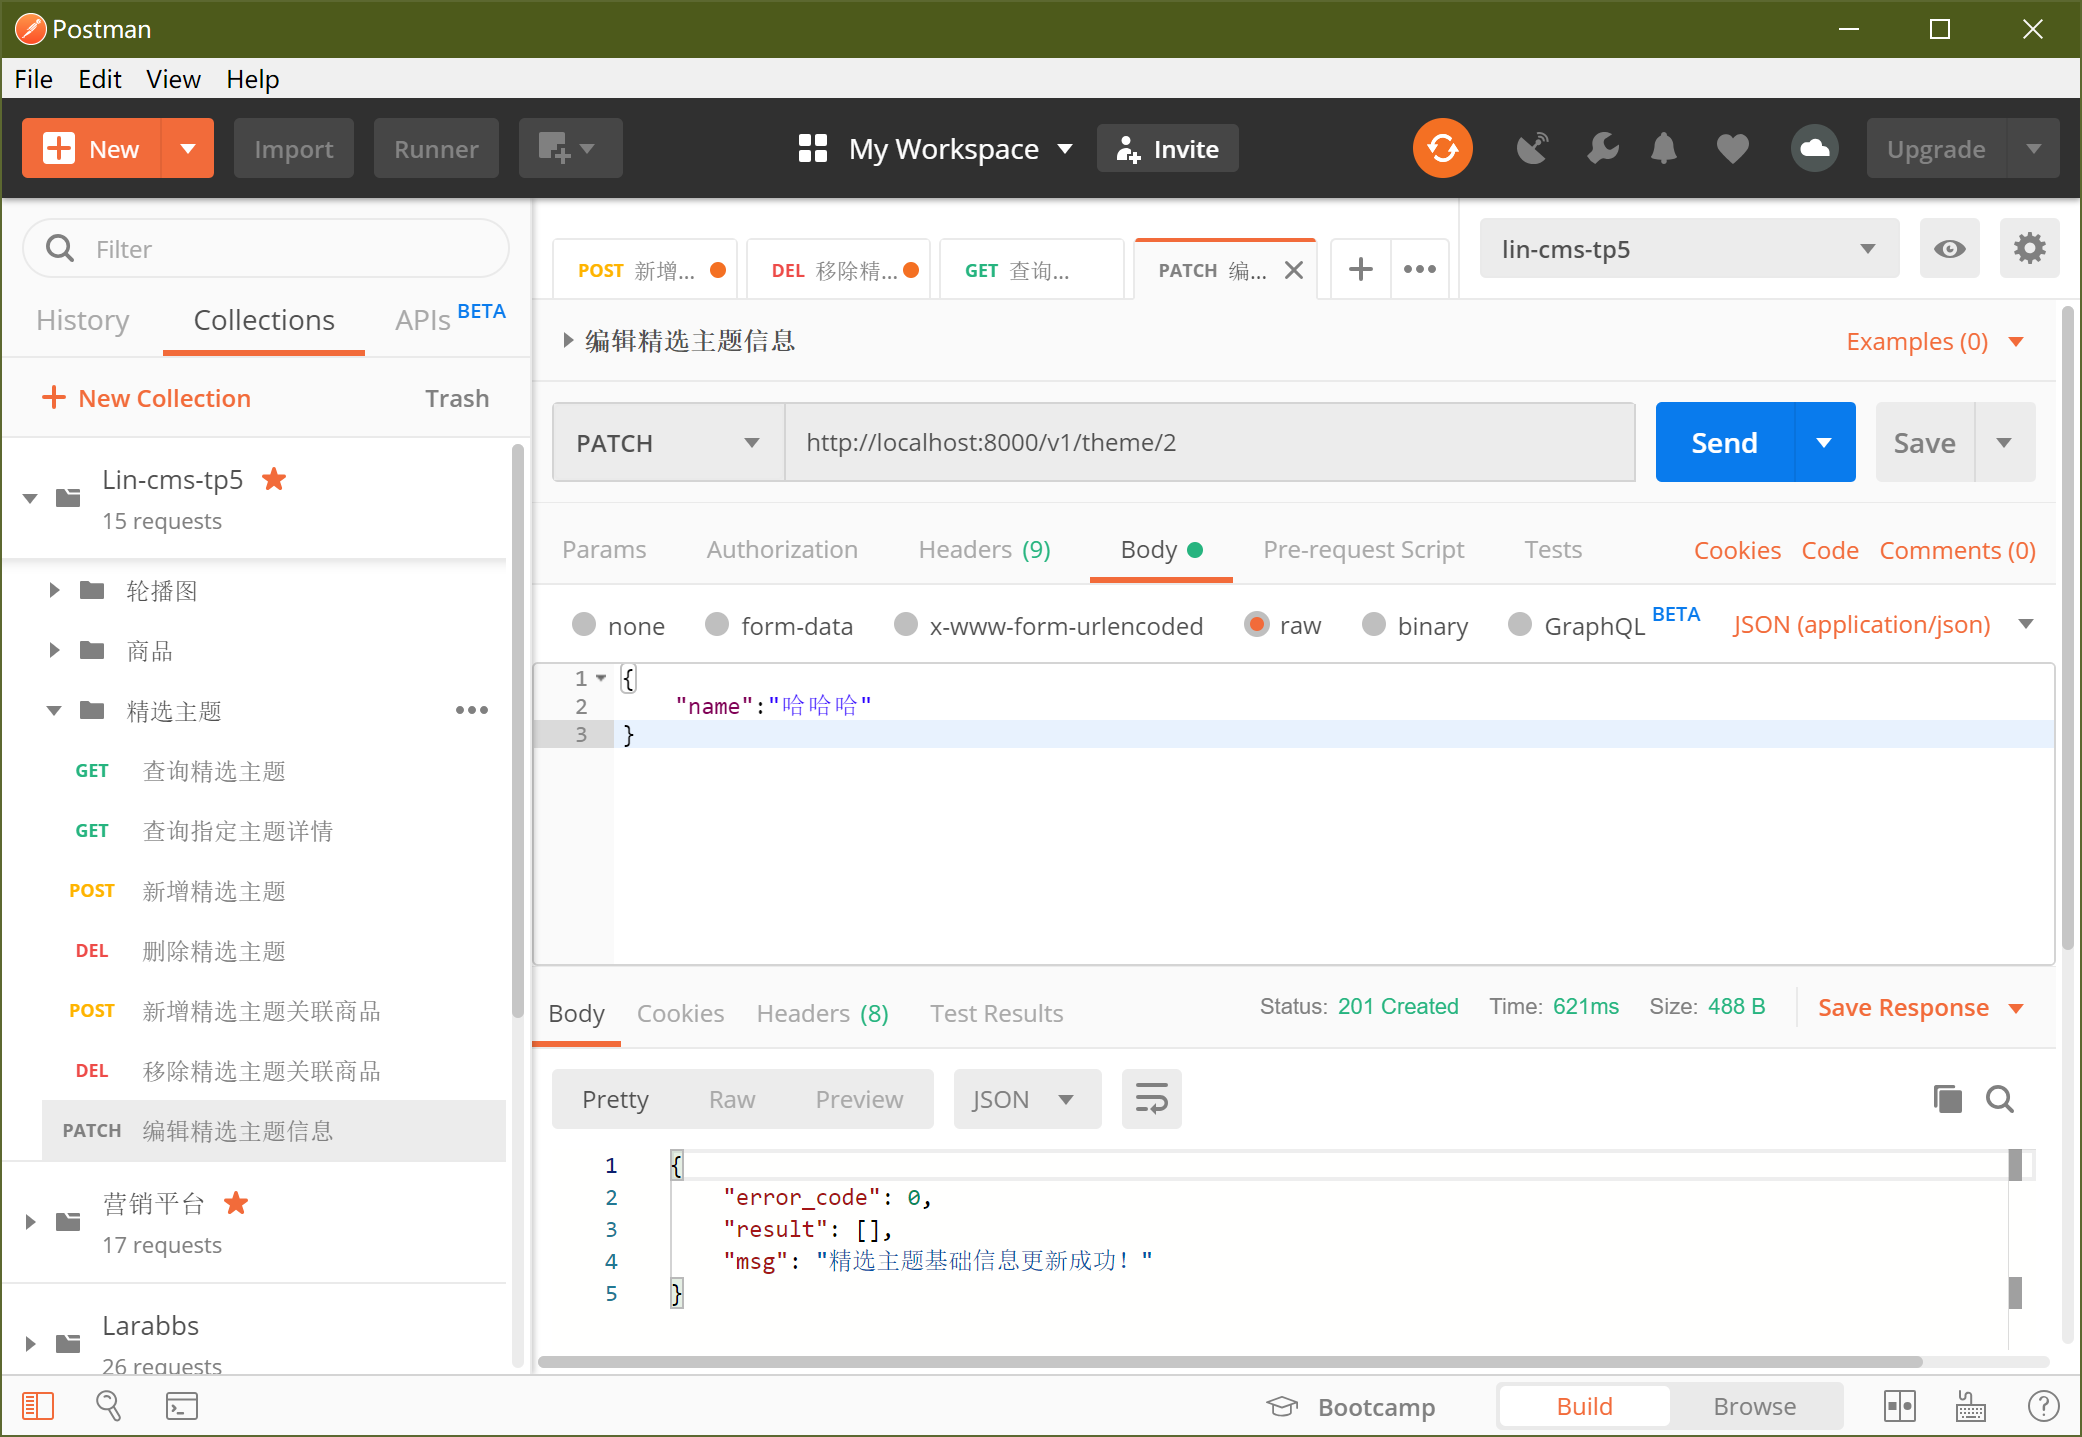
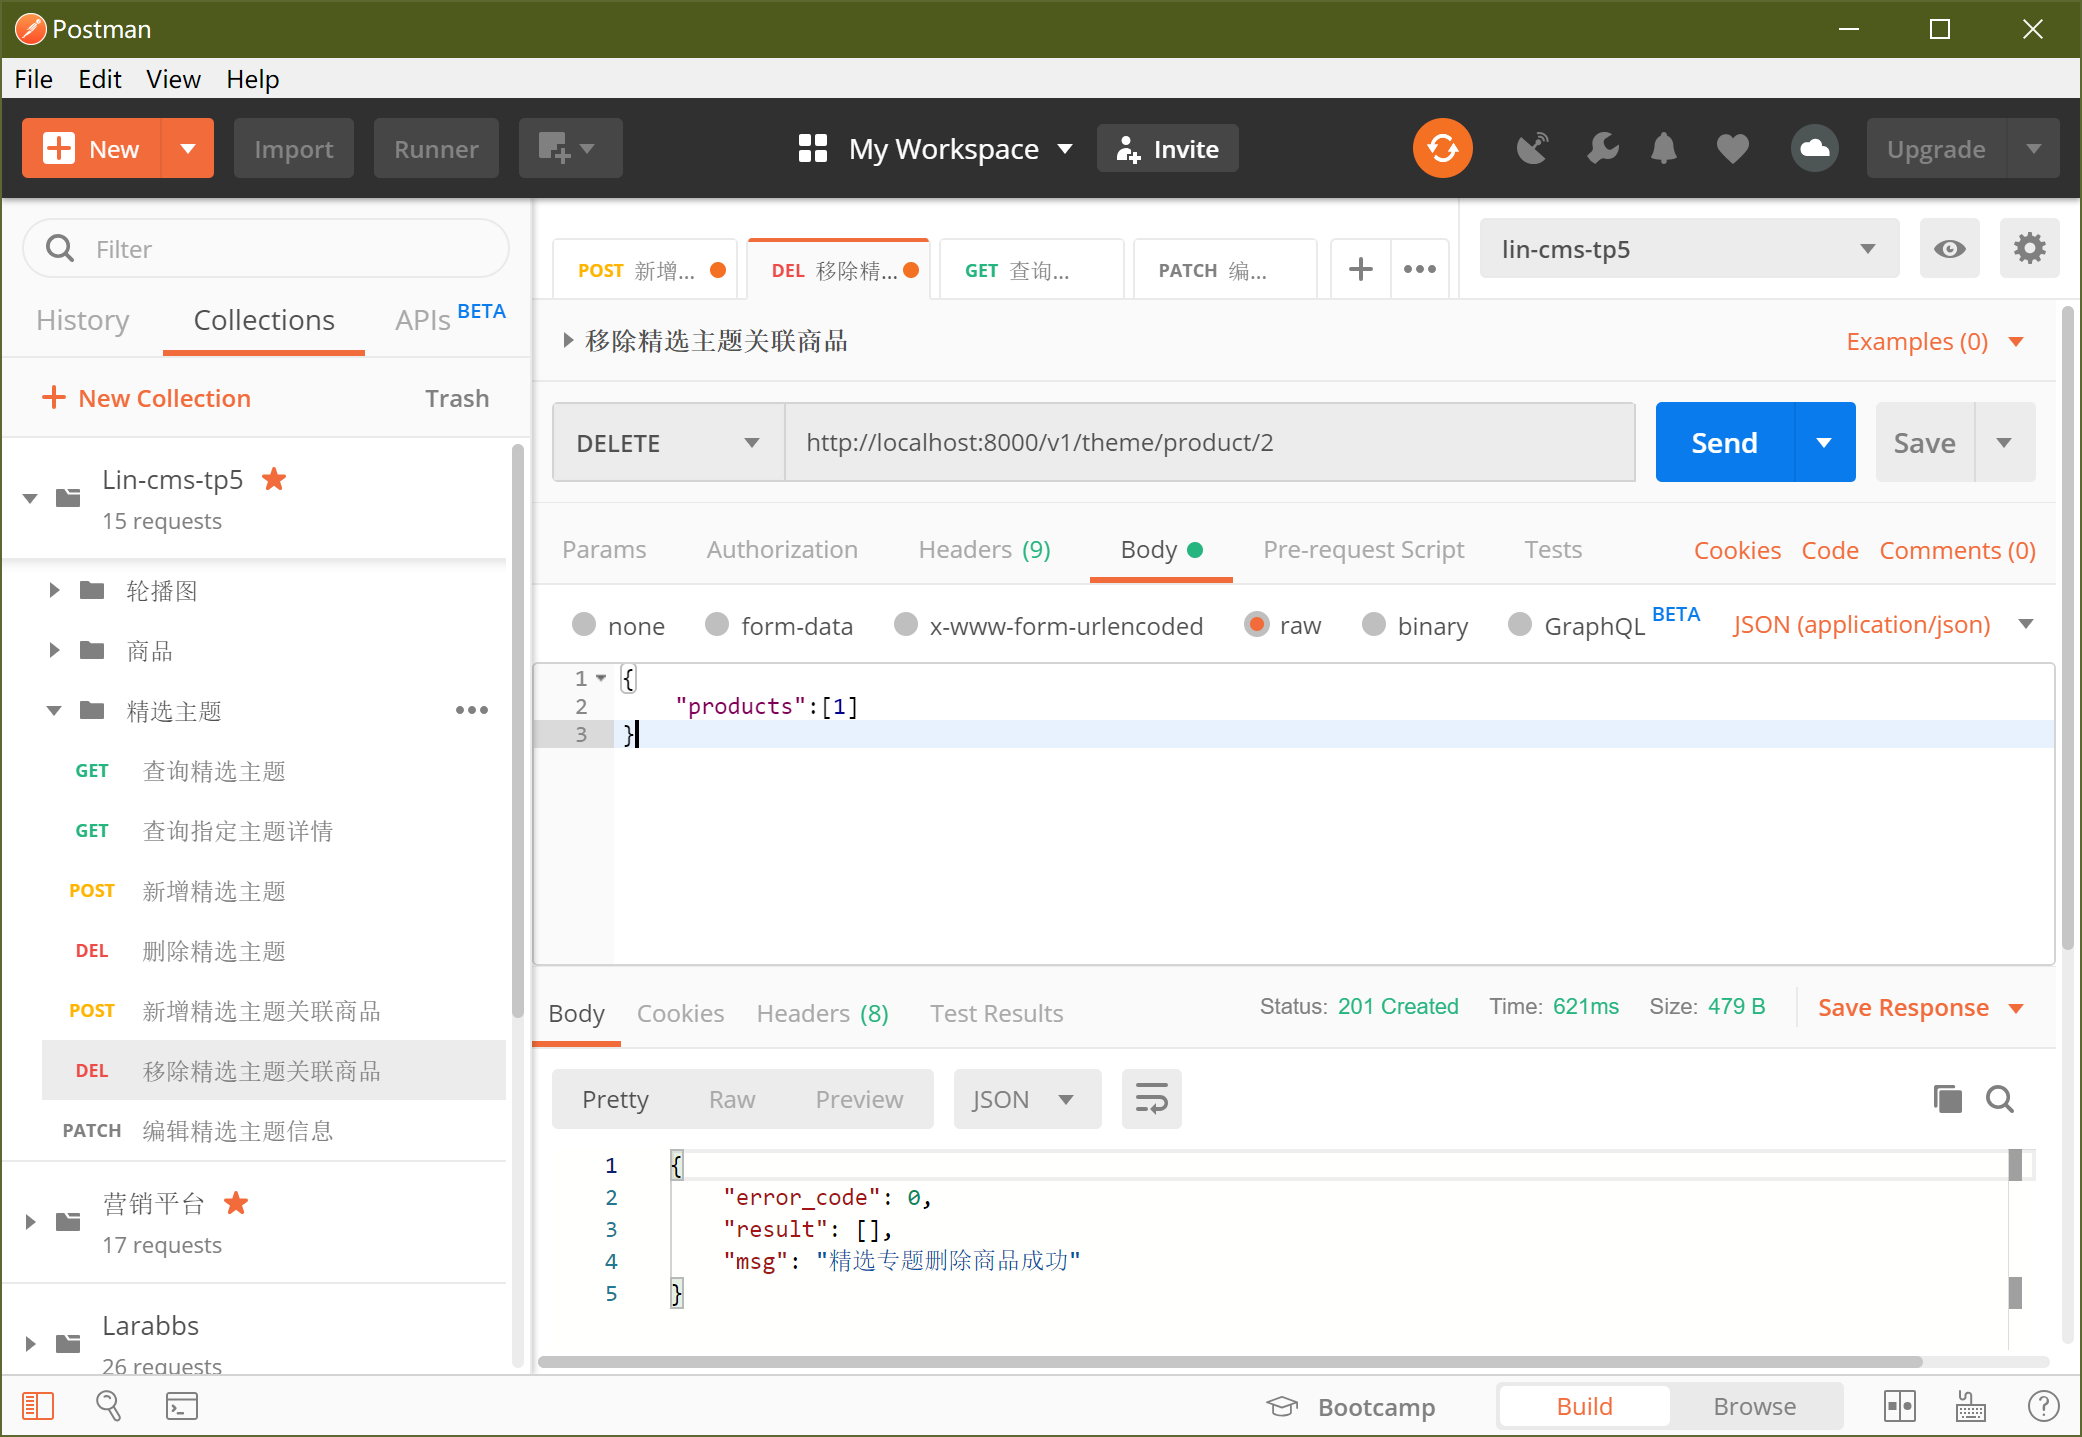
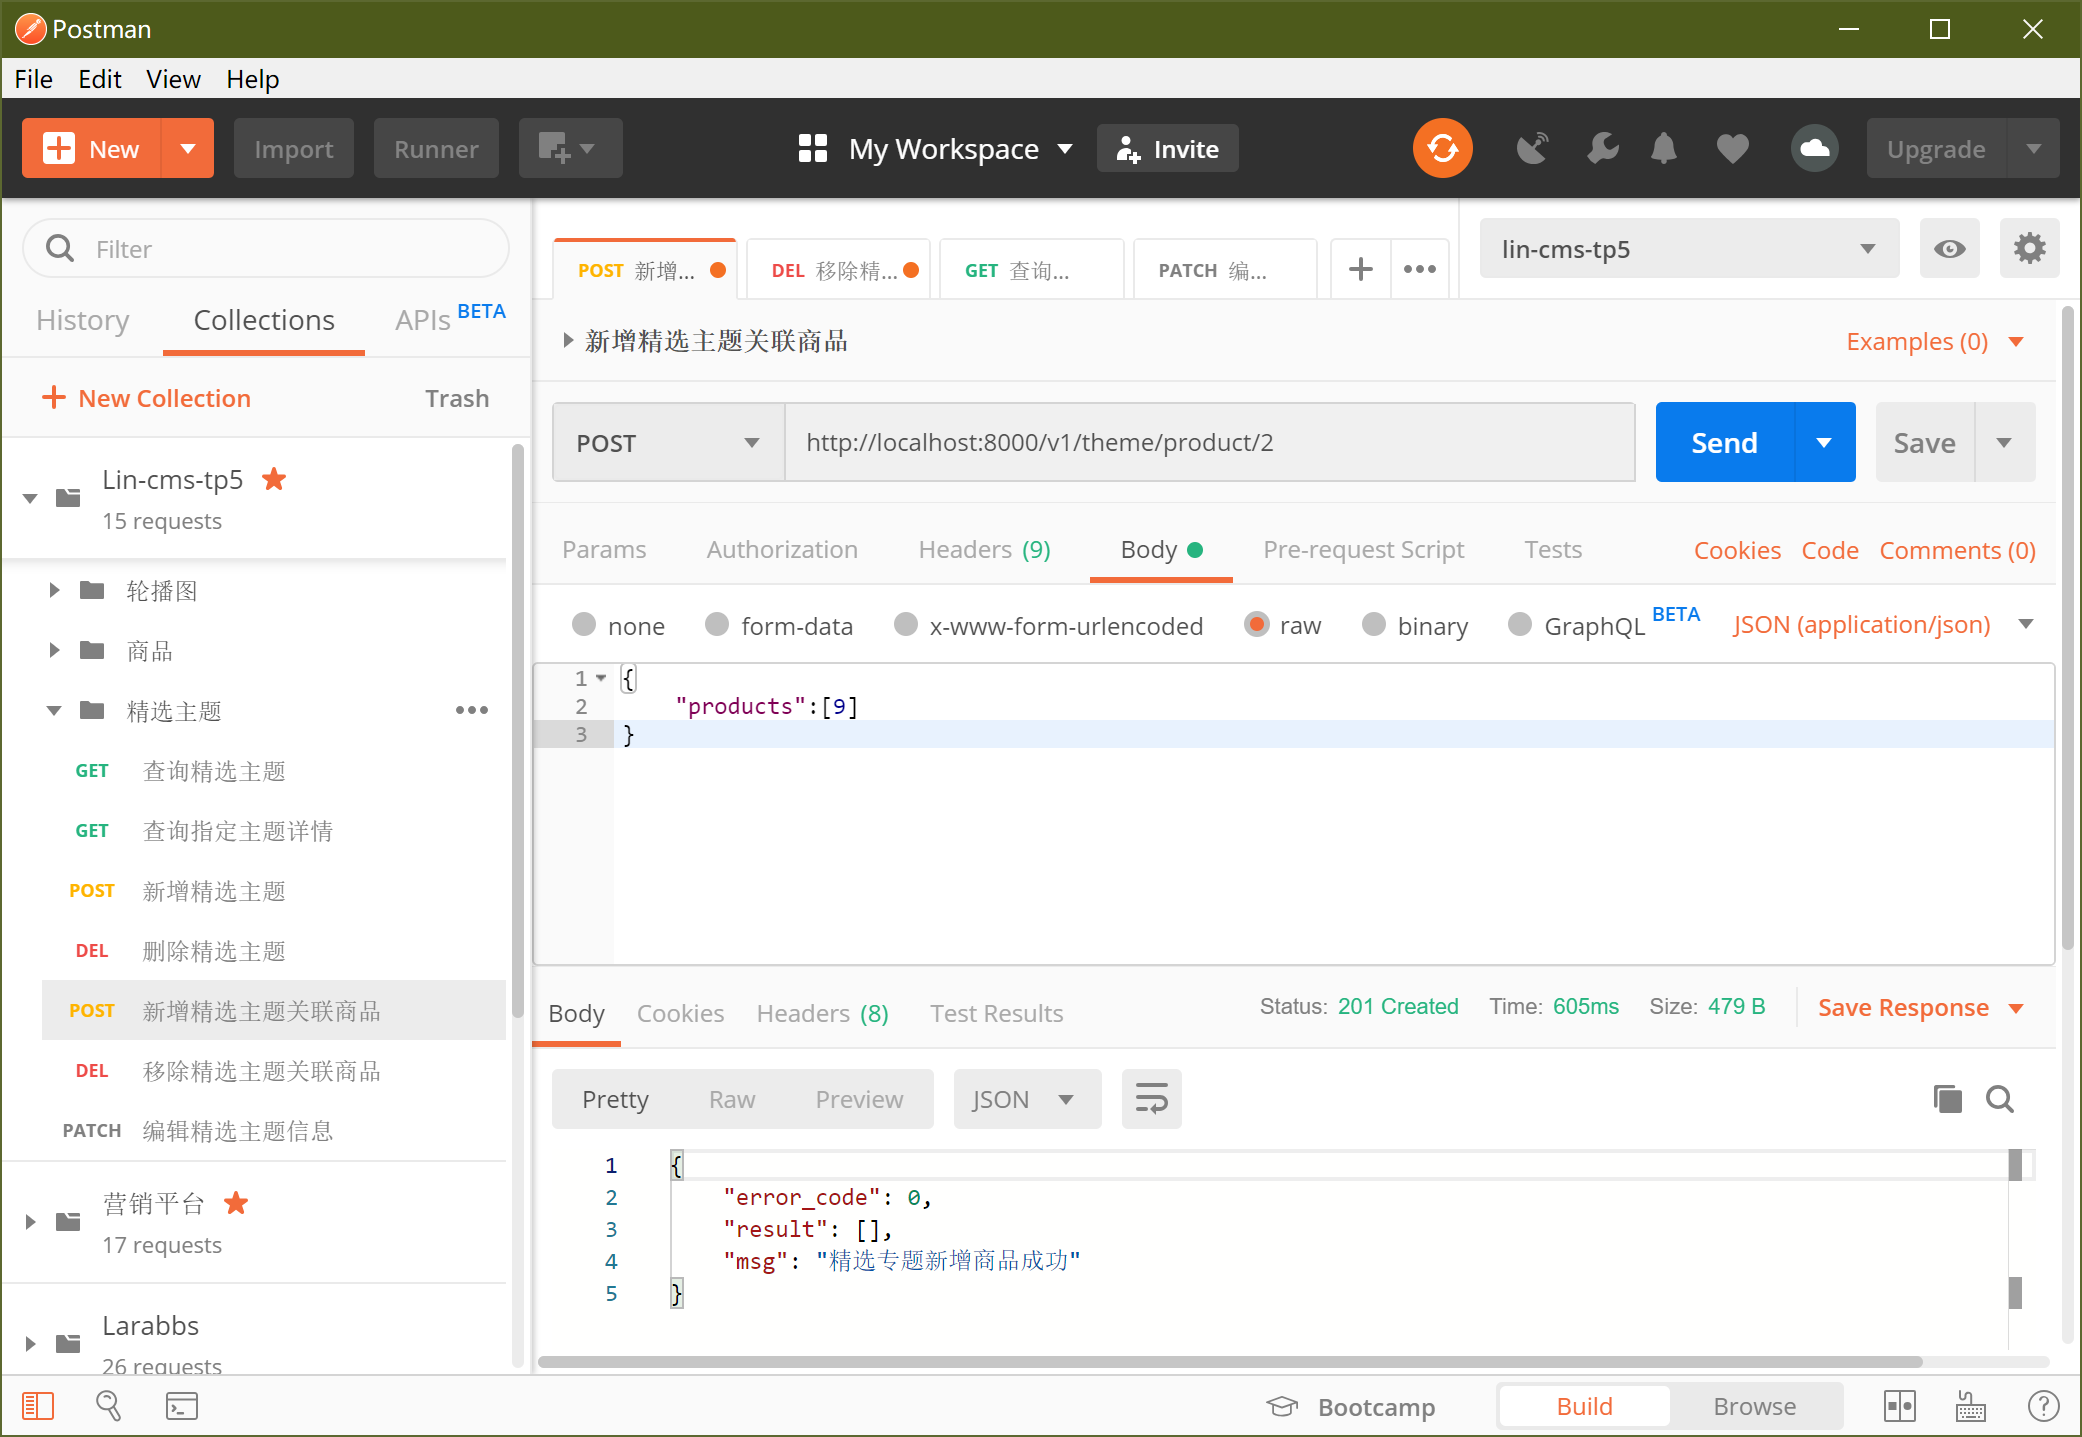
接下读者可自行测试在Postman中调用这几个接口来实现对精选主题的编辑。这里作者修改了id为2的精选主题名称,并移除了该主题下id为1的商品,然后给该主题新增了一个id为9的商品:
执行完毕之后,我来查询一下这个id为2的精选主题详情,得到结果如下:
{
    "id": 2,
    "name": "哈哈哈",
    "description": "新品推荐",
    "topic_img": {
        "id": 121,
        "url": "http://localhost:8000/images/20190814/12af7ae871c75f3944397e80453b6f75.png"
    },
    "head_img": {
        "id": 50,
        "url": "http://localhost:8000/images/2@theme-head.png"
    },
    "products": [
        {
            "id": 2,
            "name": "梨花带雨 3个",
            "price": "0.01",
            "stock": 984,
            "delete_time": null,
            "category_id": 2,
            "main_img_url": "http://localhost:8000/images/product-dryfruit@1.png",
            "from": 1,
            "create_time": null,
            "update_time": null,
            "summary": null,
            "img_id": 10,
            "pivot": {
                "theme_id": 2,
                "product_id": 2
            }
        },
        {
            "id": 3,
            "name": "素米 327克",
            "price": "0.01",
            "stock": 996,
            "delete_time": null,
            "category_id": 7,
            "main_img_url": "http://localhost:8000/images/product-rice@1.png",
            "from": 1,
            "create_time": null,
            "update_time": null,
            "summary": null,
            "img_id": 31,
            "pivot": {
                "theme_id": 2,
                "product_id": 3
            }
        },
        {
            "id": 4,
            "name": "红袖枸杞 6克*3袋",
            "price": "0.01",
            "stock": 998,
            "delete_time": null,
            "category_id": 6,
            "main_img_url": "http://localhost:8000/images/product-tea@1.png",
            "from": 1,
            "create_time": null,
            "update_time": null,
            "summary": null,
            "img_id": 32,
            "pivot": {
                "theme_id": 2,
                "product_id": 4
            }
        },
        {
            "id": 5,
            "name": "春生龙眼 500克",
            "price": "0.01",
            "stock": 995,
            "delete_time": null,
            "category_id": 2,
            "main_img_url": "http://localhost:8000/images/product-dryfruit@2.png",
            "from": 1,
            "create_time": null,
            "update_time": null,
            "summary": null,
            "img_id": 33,
            "pivot": {
                "theme_id": 2,
                "product_id": 5
            }
        },
        {
            "id": 6,
            "name": "小红的猪耳朵 120克",
            "price": "0.01",
            "stock": 997,
            "delete_time": null,
            "category_id": 5,
            "main_img_url": "http://localhost:8000/images/product-cake@2.png",
            "from": 1,
            "create_time": null,
            "update_time": null,
            "summary": null,
            "img_id": 53,
            "pivot": {
                "theme_id": 2,
                "product_id": 6
            }
        },
        {
            "id": 9,
            "name": "冬木红枣 500克",
            "price": "0.01",
            "stock": 996,
            "delete_time": null,
            "category_id": 2,
            "main_img_url": "http://localhost:8000/images/product-dryfruit@4.png",
            "from": 1,
            "create_time": null,
            "update_time": null,
            "summary": null,
            "img_id": 37,
            "pivot": {
                "theme_id": 2,
                "product_id": 9
            }
        },
        {
            "id": 16,
            "name": "西红柿 1斤",
            "price": "0.01",
            "stock": 999,
            "delete_time": null,
            "category_id": 3,
            "main_img_url": "http://localhost:8000/images/product-vg@3.png",
            "from": 1,
            "create_time": null,
            "update_time": null,
            "summary": null,
            "img_id": 69,
            "pivot": {
                "theme_id": 2,
                "product_id": 16
            }
        },
        {
            "id": 33,
            "name": "青椒 半斤",
            "price": "0.01",
            "stock": 999,
            "delete_time": null,
            "category_id": 3,
            "main_img_url": "http://localhost:8000/images/product-vg@5.png",
            "from": 1,
            "create_time": null,
            "update_time": null,
            "summary": null,
            "img_id": 67,
            "pivot": {
                "theme_id": 2,
                "product_id": 33
            }
        }
    ]
}
2
3
4
5
6
7
8
9
10
11
12
13
14
15
16
17
18
19
20
21
22
23
24
25
26
27
28
29
30
31
32
33
34
35
36
37
38
39
40
41
42
43
44
45
46
47
48
49
50
51
52
53
54
55
56
57
58
59
60
61
62
63
64
65
66
67
68
69
70
71
72
73
74
75
76
77
78
79
80
81
82
83
84
85
86
87
88
89
90
91
92
93
94
95
96
97
98
99
100
101
102
103
104
105
106
107
108
109
110
111
112
113
114
115
116
117
118
119
120
121
122
123
124
125
126
127
128
129
130
131
132
133
134
135
136
137
138
139
140
141
142
143
144
145
146
147
148
149
150
151
152
153
154
155
156
157
158
159
可以看到,这个精选主题的名称已经被我修改了,而且主题下id为1的商品已经没有了,然后新增了一个id为9的商品。
# 章节回顾
本章节我们实现了对精选主题的管理,内容基本上是对轮播图管理章节内知识点的重复运用,在这个基础上,我们首次接触了多对多这种表的关联关系。正如我们在前面提到过的一样,多对多也是一种常见的关联关系,但是由于相对一对一和一对多较难理解,加上操作略微复杂,有时候我们会习惯性简单粗暴的直接用两张表来实现其效果,也正因为如此,才会为日后系统扩展和功能实现埋下大坑。幸好,在通过对精选主题管理的分析和实践之后,我们掌握了多对多的概念、应用场景和如何利用模型来快速实现操作中间表记录,相信各位读者已经能够初步驾驭这种关联关系的设计和运用,如果你还是觉得没有掌握,不妨再重复阅读下本章节,或者接着继续学习,因为在后面的章节中我们一样还会涉及到这种多对多的关联操作。
- 上一页
- 首页
- 1
- 尾页
- 下一页
- 总共1页
